Monthly Archives: January 2018

Mardi Hearts

Standard

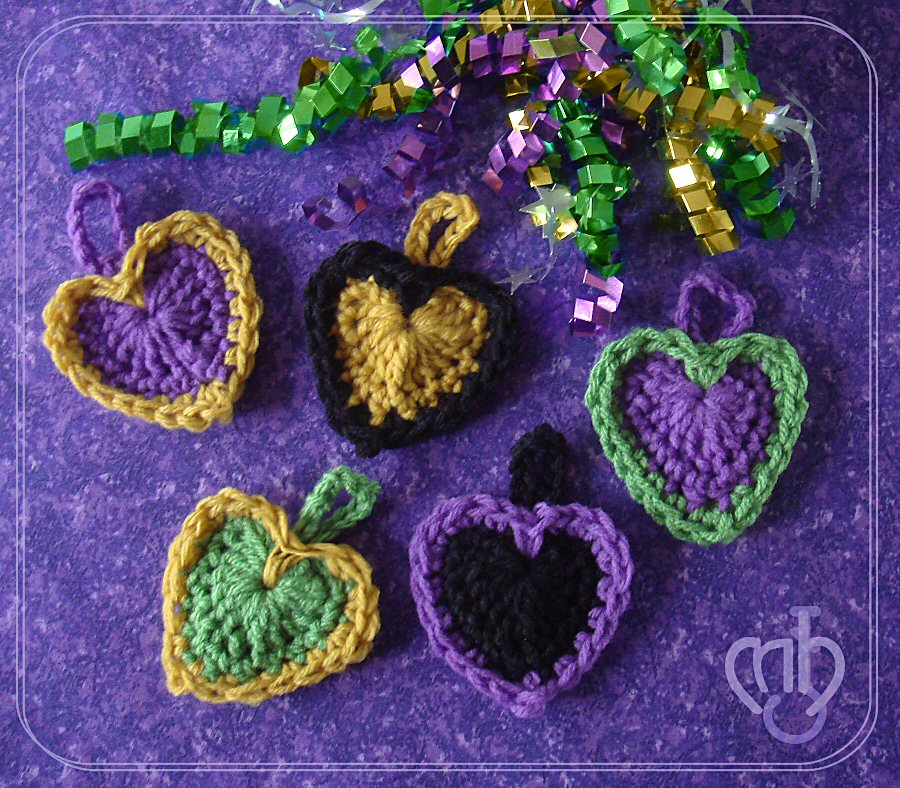
Everyone needs a few more hearts in their life, and there are about ten thousand and one different ways of making them. Now, here’s my version to make it ten thousand and two. I designed this pattern on a Tuesday, it’s being released on a Tuesday and at this time of year, with thoughts of Carnival and Mardi Gras – well, the name seems to fit.

Mardi Hearts made of acrylic yarn can be used as a key fob, in a garland, for a gift tag and many other possibilities. In cotton yarn, the hearts can be tawashi scrubbers, makeup removers, kitchen decoration and so much more. You don’t need to wait for a celebration or Valentine’s Day or even a Tuesday to make one or more of these. Fill your life with symbols of love!

Mardis-Hearts_MichHooker

You can download this pattern as a PDF from the Ravelry pattern page.

YARN: Worsted/Aran (about 6 yds)
HOOK: H/8 (5mm)


Begin with Color A.

Form a ring.

Into the ring (A): ch2 (counts as first dc), 6dc, tr, 7dc, sc

Tighten ring, but not completely.


Do not turn; continue (A) with the next round: sc in each dc, hdc in tr [the tip], sc in each dc, sl st to sc.

Ch12, sl st back into sc (hang-loop made).

Fasten off A.


Attach Color B with sl st in the tip, then: 4sc, (2sc), (2sc), sc, long-sc into ring (with hang-loop to the left), long-sc into ring (with hang-loop to the right), sc, (2sc), (2sc), 4sc, sc in the tip. Join.

Fasten off B.

Tighten ring fully. Tuck in the tails.


Make more Mardi Hearts and… laissez les bontemps rouler!

Mardi Hearts crochet pattern is ©2018 Mich Hooker


crochet
pattern
free
valentine
heart
crochet
valentine
heart
crochet
pattern


Display models

Standard

In 2015, I had fun playing with the Harry Potter Knitting & Crochet House Cup group on Ravelry. Fun-loving crafters enroll in Hogwarts-themed classes, using what they knit, crochet, spin or weave as “homework” to present to their professors for grading. That’s a nutshell description only; it actually is a lot of fun.

In one of my “classes,” the assignment was to finish a project that has otherwise been procrastinated on, and the “craft” detail was open to any craft at all. When my professor okay-ed my proposal, I got right to work on this long-delayed display model project. HPKCHC was giving me great incentive to finally work on this, but I had only 13 days before the end of the month when the finished assignment would be due. No time to delay!

I began with a couple styrofoam heads I had procured a year or two before and ended up storing to the side while life kept me busy in other directions, because styrofoam…eh. It’s ugly by itself, resists paint, is easily dented, etc.

Step one was to cover the styrofoam and to equalize the models on the off-chance that I might need to use them together at some point. I neglected to take photos of the untouched heads or initial steps, but this is how they looked in the catalog.

2015-06-17_153901

Both models were covered completely in masking tape to provide a surface that was usable. She has a base to help show off her elongated neck, but he was cut off at the neck and appeared stunted, so I built him a similar base using cardboard, newspaper and masking tape.

20150623_53b

They were covered with papier mâché, dried, given another layer of papier mâché and dried again. This was followed by a couple layers of gesso. When that was dry, there was a vigorous sanding session to reduce the bulges and wrinkles. Five more layers of gesso followed.

20150623_69b

There wasn’t enough time to enhance the features, so I chose to reduce any attempt at realism and let them be more symbolic. This meant patching over the eyes with paper and tape, followed by more papier mâché and a couple layers of gesso. Everything received a good sanding again and another coat of gesso.

20150630_30b

There were many coats of gesso and additional sanding. The black base paint was applied with only a couple days remaining before the deadline. What a difference it was to watch the light models turn dark, and darker still with each additional paint layer. Every little bump and ripple was more visible, but that somehow created a delightful aesthetic so unlike styrofoam or plastic.

20150630_34b

When the black layers were dry, I sponged on a metallic bronze in a haphazard fashion. The models now appeared as somewhat vintage metal forms, and they were ready to start displaying all the scarves and hats I can work up!

20150630_66b

I wrote this post not long after completing the project, saved it in drafts and promptly forgot about it, heh. Life got very busy around then, and time passed.

But now – at least for awhile – I’m back.